The following is a series of articles on describing the process I went through to install my first tower. It has now been 2 years since the tower became operational and it has worked flawlessly.
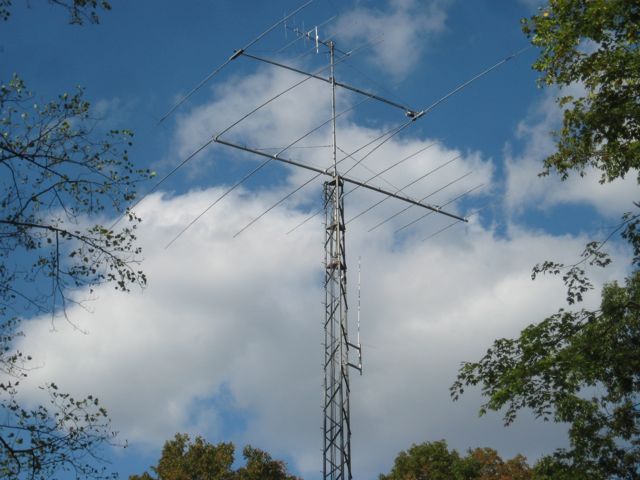
Completed Tower and Beams
I, like most hams have always longed for bigger and better antennas. For most of my time as a ham I lived in sub-divisions that would only allow very discrete antennas. None of these locations had trees large enough for hanging wire antennas, so my only antennas for many years were short verticals. These verticals seemed to work pretty well, but didn’t provide opportunities for much DX because they were short and had only a few short radials.
After I moved to the country in 1993, I dreamed of installing a tower with a beam but for nearly 15 years my job kept me from spending much time much with my radio equipment or antennas. In 2008 I retired and found I had a lot more time to spend with my radios. I installed a 135′ doublet up 50 feet between two of our large trees and suddenly I was working DX I had never heard on my verticals. After chasing DX for a couple of years using the doublet I got the itch to install some sort of beam antenna. In the next several posts I will walk you my experiences (good and bad) of installing my first (and probably only) tower and beams.
After I had made the decision to put up a tower I realized I didn’t know where to start. After doing some initial searching on the internet I found a few sites wherer other hams chronicled their own tower installations. Most of those sites focused on the actual installation of the tower and did not cover any of the preliminary steps such as:
- Site selection
- Building permit preparation and approval
- tower and antenna selection
- RFI analysis
- Selection of all of the other components needed to make the system work (rotor, rotor control, coax, rotor cable, switching and lightning protection and grounding).
I then purchased three books that I found very helpful. They were Up the Tower, by Steve Morris, Antenna Towers for Radio Amateurs by Don Daso and Antenna Zoning for the Radio Amateur by Fred Hopengarten. After reading each of these books cover to cover I quickly realized that a lot of planning and preparation would be needed to insure a reliable, long lasting and well performing tower installation.
My next step was to contact W9RE, a local ham I knew had significant experience installing and maintaining towers. W9RE, Mike, is a legend in the ham radio world for his world class performance in contests. His station also has a world class antenna farm.
Mike visited my house and helped me scope out a couple of potential locations for the tower. Mike pointed out that a number of trees would have to be removed to make room for the tower and beams. It also appeared that additional trees might have to be removed to make the space needed to actually erect the tower. Mike also, suggested the names of a couple of hams that might be willing to do a turnkey installation.
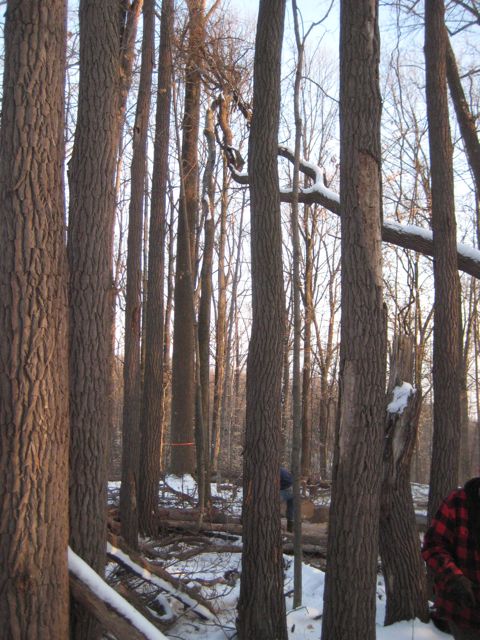
Woods Behind House
I thought my dreams of a tower were about to come to and end since my wife was not pleased at the prospect of having to remove a bunch of trees to make room for a tower. Fortunately, another event occurred that made the issue of the trees a moot point. Our septic system failed. After a visit by the local health inspector it was determined that we would have to install a new septic field. Because of the new stringent regulations governing septic systems in our county we were told we would have to clear nearly an acre of woods behind our house to make room for the new septic field! I would not be allowed to install my tower in the septic field, but the removal of nearly 100 trees would open up a lot of space that could be used to erect the tower.
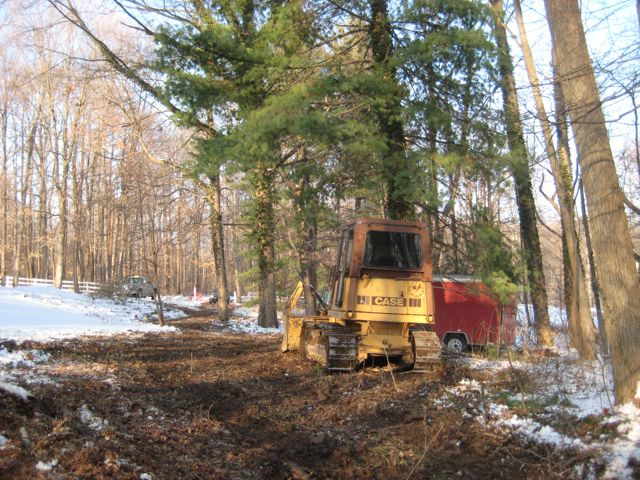
Tree Removal Begins
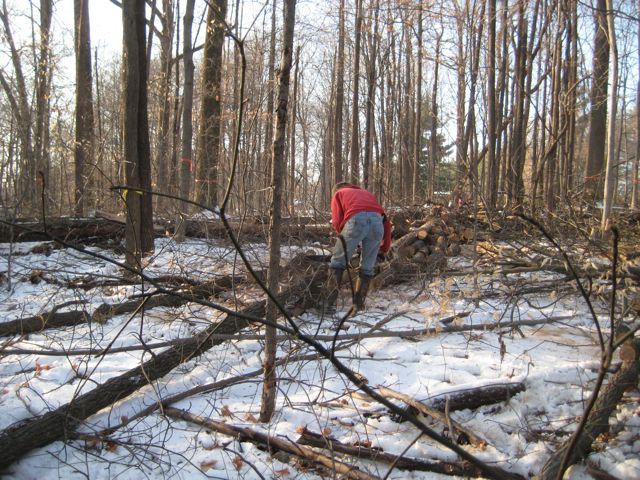
The process of clearing the field for the new septic field started in December 2010. However, because of the weather and other factors the tree removal took nearly four months. The building code required that the trees and a large portion of the roots had to be removed. Her are a few more photos showing that process. There were chains saws, a bulldozer and backhoe busy for weeks clearing the field to make room for the new septic system. Several tri-axles full of wood had to be hauled away.

After Trees Removed
New Driveway
The next issue we ran into was that we had to build a second driveway to provide access to the new septic field otherwise we would have to wait until August for the ground to get solid enough to bring in the tanks, gravel and other items needed for the septic system.
The photo to the right shows the new driveway before it was layered with 15 loads of crushed stone.
In the end, the new driveway was very useful during the tower installation. It enabled easy access by the concrete trucks and ultimately by the 120′ crane that was used to erect the tower and antennas.
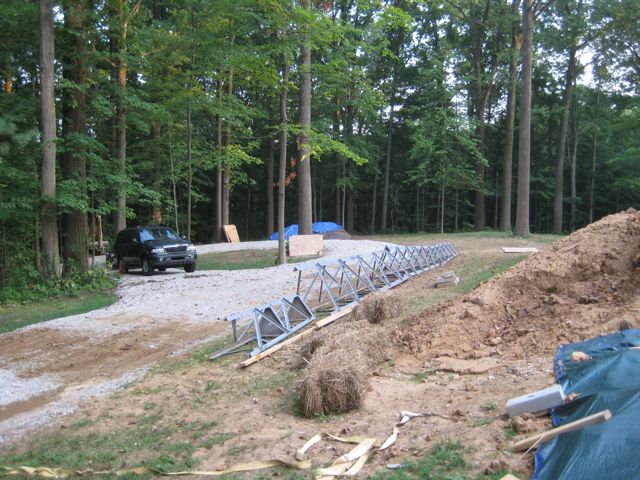
Portion of the New Driveway and the unassembled Tower
The photo to the right shows a portion of the new driveway along with several tower sections waiting to be assembled. The dirt to the right is from the excavation for the tower base.
In the next installment I’ll talk about the preparing the building permit and some of the other planning that had to happen before actually starting the construction of the tower.
73,
Fred
While I was waiting for the woods to be cleared I started the process of preparing my application for a building permit. The first step was obtain a copy of the zoning regulations for my county. I was able to download the latest zoning regulations from County Zoning Boards website.
The next step was to read the regulation cover to cover (several times) paying particular attention to any language dealing with towers and tall structures. The information for towers and tall structures was spread out through the entire document. After highlighting the appropriate sections I started gathering the information that would be needed in the building permit. This is where Fred Hopengarten’s book, Antenna Zoning for the Radio Amateur, was very helpful. His book contains a CD that has sample applications and a number of other useful documents.
Much of the information in the Zoning Regulations was included to address cellular phone towers. Unfortunately, the regulation did not specifically address amateur radio structures and the language which addressed cell phone towers did not exclude amateur radio towers and included a number of requirements I could not meet. This is when I called the Zoning Department to get clarification. Since I am zoned rural, the requirements for my tower were not covered by the section on radio towers but in the section on farm structures (silos etc.). As long as my tower was under 100′ in height I would not need present my application at a zoning board meeting; which was a relief. All I had to do was drop off the regulation at the zoning department along with a check!
The final application included:
- A description of the tower along with the various codes that the tower complied with. I also included an engineering drawing of the tower.
- Drawing showing property line and road setback distances
- Technical drawing of the tower base (obtained from Trylon)
- I also included a copy of my RF exposure analysis even though it was not a requirement for the permit but had to be done to comply with the FCC requirements. I found an website where I could load in my information on power, distances and antenna gains and perform the calculations.
- I also included a Photoshop created image of what the tower would look like from the street. Fred talked about how to do this in his book.
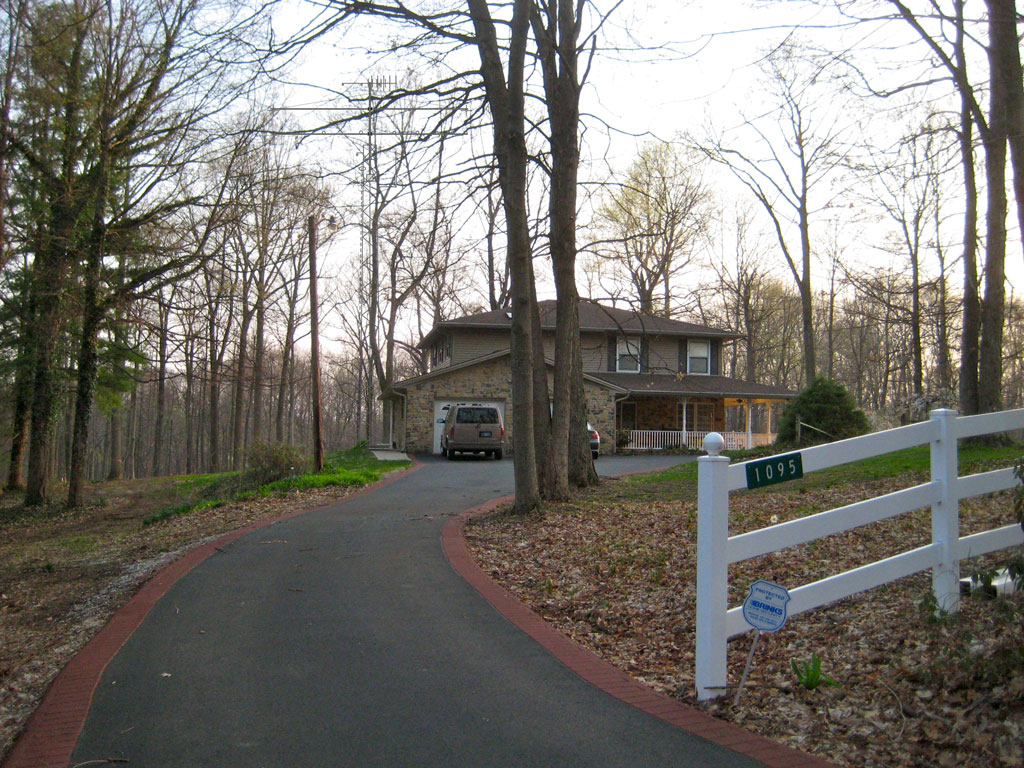
Photoshop Created Image Showing How the Tower Would Appear when Installed
It is amazing how close the final installation looks like the initial Photoshop created drawing. You my need to click on the photo to see the tower hidden in the trees just to the left of the house. The actual tower looks nearly identical to this Photoshop mockup.
Once I submitted my permit and paid my application fee I had a building permit in my hands within a week. I feel fortunate compared to many hams that find it nearly impossible to obtain the critical building permit.
At the same time I was preparing the building permit application, I contacted Don Daso, K4ZA, to see if he would be available to install my tower. He said he would be available, but it would be a several months before he could actually start the work. He suggested that he perform a site survey during one of his upcoming trips to work with another client. Prior to the site survey I sent Don my preliminary specifications (tower height, antenna selections etc). During the site survey Don suggested several changes to my preliminary list. Most were aimed at improving the reliability of components on the tower (rotor, antenna selections, hardline versus coax, lightening protections and antenna selections.
At this point Don and I began to pass an Excel spreadsheet back and forth through email so that he could continue to review and approve as I made the suggested changes. The Excel spreadsheet was also used to keep track who would provide the various components that would be needed (me or Don). I also used this spreadsheet to track the order and delivery of all the stuff after the orders were placed, and to keep track of the mounting costs.
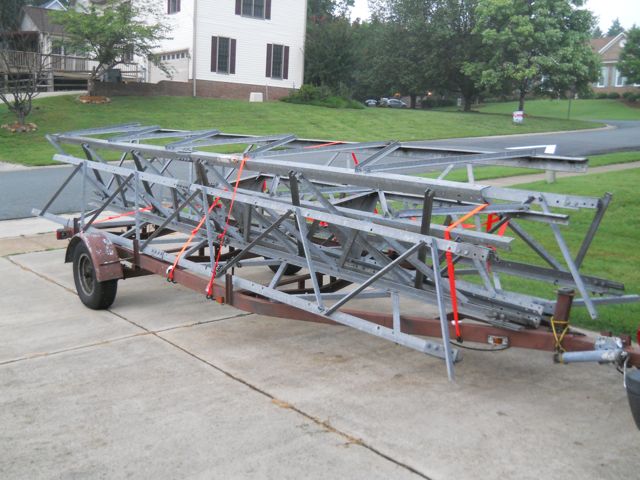 Don also contacted me and told me he had found a nearly new takedown tower that was identical to the one I had planned to purchase. I contacted the owner of the tower and we agreed on a price. Don then picked up the tower and dropped at my place on the way to another client. Don saved me a bundle on the tower. The Trylon Super Titan was like new and I got it for about 40% the cost of a new tower.
In the next installment I’ll briefly describe the hardware on the tower and start the construction process.
73,
Fred
Once the tower was selected I started the process of nailing down the aluminum that would be on the top of the tower. Since I felt this would probably be the only tower I ever have installed, some of my key requirements were:
- Get the maximum band coverage from the antennas on the tower ( 40m thru 70 cm)
- The antennas had to have a good reliability history with a minimum of parts that might fail (traps or moving parts).
- Install long life feed-lines (hardline)
- An oversized rotor to reduce the risk of a rotor failure
- Chrome Molly mast
- 60-70′ self supporting tower
- Dual thrust bearings; so the rotor could be easily replaced without removing the antennas
- Only two feed-lines to the ham shack (switching required at the base of the tower in a weather proof enclosure)
- High quality lightening protection
- Select tower to withstand 110 mph wind without ice and a 85 mph with 1/2 inch of ice.
Ultimately the primary antenna I selected was an M2 10-30 LP8, 8 element log periodic, which covers 30m to 10m. For 40m I selected a Cushcraft XM-240 2 element yagi and for 6m, 2m and 70cm I selected a Cushcraft A627013S.
The rotor I selected was an M2 Orion 2800P w/o their controller. I ordered a Green Heron RT-21 rotor controller.
Once the material list was complete and had been approved by Don, I began to place orders. Some of the items had longer lead times than others. As the materials arrived I marked them as having arrived on the Excel spreadsheet. Once all of the materials had arrived it was time to construct the tower base.
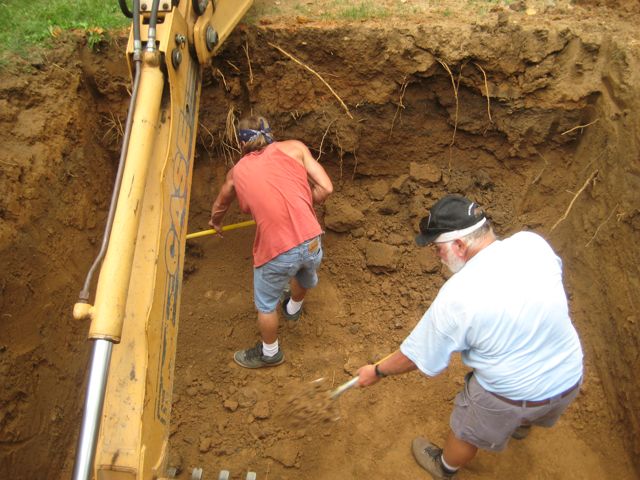
Digging the Hole
The base for the 70′ Trylon Super Titan requires a larger base. I chose a pad and pier design. The pad is 10′ by 10′ x 2.5′ with a 5′ x 5′ x 5′ pier. The base took a total of nearly 16 yards of concrete.
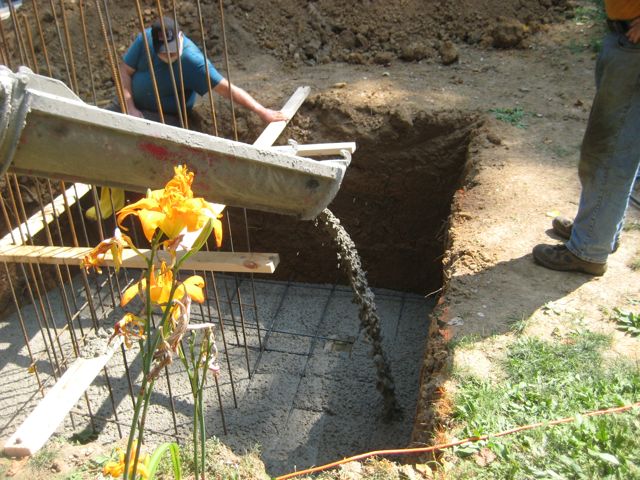
Pouring the Pad
Once the 10′ x 10′ x 7′ deep hole was completed it was time to pour the pad.
Pouring the Pad
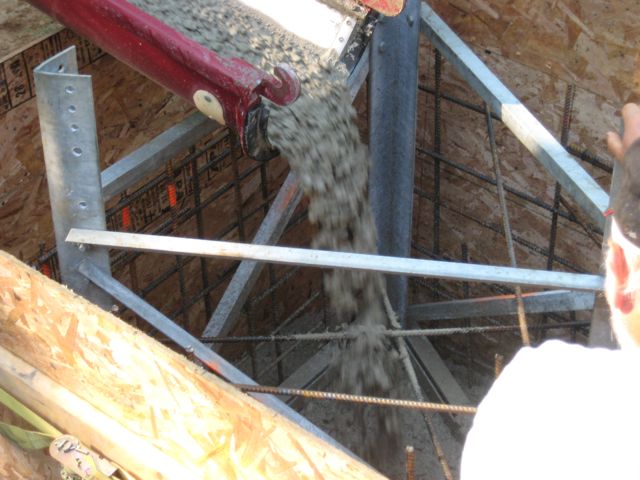
Once the pad was pour a second pour was made for the pier.
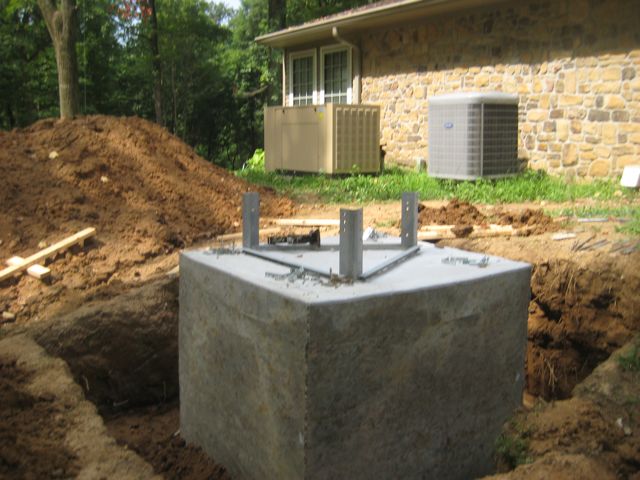
Completed Base
Once the forms were removed we get our first look at the mammoth chunk of concrete.
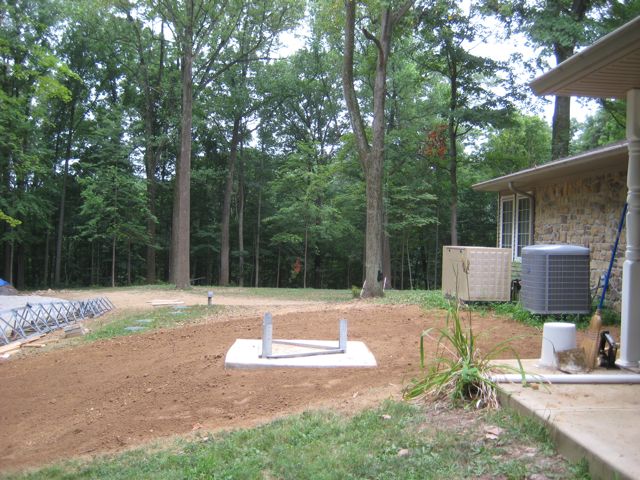
Base After Final Grade
The final step was to use a use a motorized soil compactor to pack the soil tightly against the base. This was followed by a final grade and grass seed. The tower base was sprayed several times a day to assist in the curing. The base then had to wait at least thirty days before the tower could be installed.
In the next installment well move into the antenna assembly and tower installation. Until next time,
73,
Fred